Finding nearby cities using SQL Server

A scenario arose recently that required me to be able to find all of the cities within a given radius from a geographic center-point (latitude / longitude).

At first I was tempted to utilize an existing mapping service to handle this for me, but most of those services impose limits on the number of requests that you can send in a given time period. In this instance, I needed something that was not going to be subject to those limits.

There are a lot of different ways to solve this problem. In this post, I am going to cover how to do so using SQL Server 2012+.

The first step is to locate a list of cities and their latitude/longitude. A good source for this is GeoNames.org. There are a wide variety of data downloads available. For my purposes, I am going to grab Cities5000.zip. This archive contains a list of all of the cities with a population of 5,000 or more.

There is a lot of really good documentation about what the download contains, but for ease of reference, I'll reproduce it here:

geonameid         : integer id of record in geonames database
name              : name of geographical point (utf8) varchar(200)
asciiname         : name of geographical point in plain ascii characters, varchar(200)
alternatenames    : alternatenames, comma separated, ascii names automatically transliterated, convenience attribute from alternatename table, varchar(10000)
latitude          : latitude in decimal degrees (wgs84)
longitude         : longitude in decimal degrees (wgs84)
feature class     : see http://www.geonames.org/export/codes.html, char(1)
feature code      : see http://www.geonames.org/export/codes.html, varchar(10)
country code      : ISO-3166 2-letter country code, 2 characters
cc2               : alternate country codes, comma separated, ISO-3166 2-letter country code, 200 characters
admin1 code       : fipscode (subject to change to iso code), see exceptions below, see file admin1Codes.txt for display names of this code; varchar(20)
admin2 code       : code for the second administrative division, a county in the US, see file admin2Codes.txt; varchar(80) 
admin3 code       : code for third level administrative division, varchar(20)
admin4 code       : code for fourth level administrative division, varchar(20)
population        : bigint (8 byte int) 
elevation         : in meters, integer
dem               : digital elevation model, srtm3 or gtopo30, average elevation of 3''x3'' (ca 90mx90m) or 30''x30'' (ca 900mx900m) area in meters, integer. srtm processed by cgiar/ciat.
timezone          : the iana timezone id (see file timeZone.txt) varchar(40)
modification date : date of last modification in yyyy-MM-dd format

You can pull all or part of the data into SQL. I am going to pull in all the columns. I don't need all of them at the moment, but they could be useful later on.

The following will create a table for the city data and use bulk import to populate it.
Note: this assumes that you have unzipped the data to c:\temp

First create the table

CREATE TABLE Cities (
geonameid       int	NOT NULL PRIMARY KEY,
[name]          nvarchar(200) NOT NULL,              
asciiname       nvarchar(200) NOT NULL,
alternatenames  nvarchar(max),  
latitude        numeric(18,15),  
longitude       numeric(18,15), 
feature_class   char(1), 
feature_code	varchar(10),      
country_code    char(2),  
cc2             nvarchar(200),  
admin1_code     nvarchar(20),  
admin2_code     nvarchar(80),  
admin3_code     nvarchar(20),  
admin4_code     nvarchar(20),  
[population]	decimal,
elevation       int,  
dem             int,  
timezone        nvarchar(40),  
modification_date_tmp	nvarchar(50)
)

Now, import the data

BULK INSERT Cities FROM 'c:\temp\cities5000.txt'
WITH
(
FIELDTERMINATOR = '\t',
ROWTERMINATOR = '\n'
);

Ok. We have our raw data. Now we need to let SQL Server know how to plot each of these cities on a geographic plane. To do this, we are going to use the geography spatial data type that is available in SQL Server. geography is actually a .Net CLR data type that is specifically tailored to work with latitude and longitude. You can read more about geography here

ALTER TABLE Cities 
ADD Point AS CONVERT([geography],
                     CASE WHEN [Latitude]<>(0) 
                          AND [Longitude]<>(0) 
                     THEN Geography::Point([Latitude],[Longitude],(4326))  
                     END,(0))

Let's break down what is happening above.

First, I'm adding a Point as a column to Cities. In this instance, I'm creating a computed column. As Latitude or Longitude is updated, this will automatically update the value for Point. If you would prefer, you can create Point as a geography column and run an update statement to do this calculation once. (just remember to re-run update if you re-import the data!).

I'm using CONVERT to turn the data into a geography type.

I'm wrapping the data in a CASE statement to skip the conversion if Latitude and Longitude aren't set properly.

Finally, I'm converting the Latitude and Longitude into a geographical point using Geography::Point(). The :: is SQL Server syntax for calling the Point method on the geography data type. Think of it like a static method on a class.

In this case, Point takes a latitude, a longitude and something called a SRID (Spatial Reference Identifier). In this case, I'm using 4326 which gives us the standard -180:180/-90:90 that you're probably used to seeing.

If you open SQL Server Management Studio (SSMS) and select all the records from cities, you should see a new tab called "Spatial Results". Clicking that will give you something similar this.

First 5,000 cities

Great!

Now then, what if we want to use this data to find all of the cities within 5 miles of Manhattan?

First, let's grab the Point from Manhattan.

SELECT Name, Point FROM cities WHERE name = 'Manhattan' AND admin1_code = 'NY'

The result should resemble the following:

Manhattan	0xE6100000010C475A2A6F47644440A4703D0AD77D52C0

That hex string on the right is the text representation of Manhattan's center-point.

To draw a 25 mile circle around that center-point we are going to use another built-in method called STBuffer.

STBuffer takes a single argument of Distance which is defined in meters. Since we are trying to work in miles, we are going to have to do a conversion.

SELECT Name, Point, Point.STBuffer(5 * 1609.344) as SearchArea
FROM cities 
WHERE name = 'Manhattan' 
AND admin1_code = 'NY'

The 1609.344 in the query above is the approximate meters per mile.

This time if you look at the Spatial Results (and select SearchArea from the dropdown on the right) you'll see something like this:

Manhattan 25 mile radius

Now for the final step.

DECLARE @SearchArea GEOGRAPHY

SELECT @SearchArea = Point.STBuffer(5*1609.344)
FROM cities 
WHERE name = 'Manhattan' 
AND admin1_code = 'NY'

SELECT Name, Point
FROM Cities
WHERE [point].STIntersects(@SearchArea) = 1 

In the query above, I have saved the search area we defined to a variable so that it is easier to use later on.

The heavy lifting here is being done by STIntersects. Like STBuffer, STIntersects is a method available off of the geography type. In this case, it takes another geography type as its argument. STIntersects will determine if the two geography instances cross over one another.

It is important to notice that this ellipse from the previous step is solid and not outlined. Since our goal is to find everything contained inside of the radius, if we only had the outline of a circle, then the only place that it would intersect would be along the exact outside of the circle. In all likelihood we would not get any results at all!

What did we get for all of our hard effort? Here are all the cities (with a population of 5,000 or more) within 5 miles of Manhattan's center-point.

Cliffside Park
Edgewater
Fairview
Fort Lee
Guttenberg
Hoboken
North Bergen
Palisades Park
Ridgefield
Secaucus
Union City
Weehawken
West New York
Long Island City
Manhattan

This barely scratches the surface of what is available as part of the Geography/Geometry functionality inside of SQL Server. For a more complete list of all of the OGC (STXXXX) methods refer to the MSDN article

SQL Server Spatial

Working in miniature

Working with computers day in and day out can leave me burned out.  I’ve tried a variety of ways to deal with this over the years, and about 7 years ago, I keyed in on one of my other passions and leveraged that as a way to “unplug” (so to speak).  I am fascinated with the age of sail.  To me, tall ships are some of the most majestic things that have ever been built by man.  While I am aware of the grim realities of life in that era, it is still possible to romanticize it.  However, I digress.  I leveraged this passion and began building model ships.  I started with plastic models and quickly burned through a variety of models due to the relative simplicity of putting together a plastic model.  Then, I few years ago, my father gave me a wooden ship model.  I loved it.  That is when I truly began to turn to model ship building as a way to turn off my digital life.  Since each model takes months and in some cases years to finish, there is always something there waiting for me.

I’ve built several more wood models since that first one that my father gave me, and I have been slowly learning tricks and techniques to add more and more detail to each subsequent model.  Most recently I have been working on a cross section of the H.M.S. Victory.  As I have been tying down the rigging, I started thinking about ways to up the level of detail on this model.  One of the ways that I am trying to accomplish this is by adding the rope coils that would exist on the pins and decking of a working ship.  At the scale that I am working, this proved to be an interesting exercise.  I wanted to make two different types of coils.  the first is the type that all of us are familiar with, the type that most of us use to bundle extension cords and lengths of rope that we have laying about the house.  The second type are a spiral that would lay flat on the deck and out of the way.

The first type of coil is relatively easy.  You need scale rope (thread will work), tweezers and some glue.  Toward the narrow end of the tweezers, start wrapping the thread around using your thumb to hold the loops in place.  Depending on the size of the coil you want to make, add additional loops.  Don’t wrap too tightly so that you don’t start compressing the tweezers.  To help with this, depending on how dexterous you are, you can use one of the fingers your are holding the tweezers with to keep them separated.  Once you have the correct amount of loops (I recommend 4-6), take the thread and wrap it once lengthwise inside the tweezers around the coil that you just created.  Start pulling that single lengthwise loop tight as you slowly move the coil toward the end of the tweezers.  DO NOT take the coil off the tweezers yet.  By moving the coil toward the end of the tweezers, it should allow you to fully tighten the lengthwise loop around the coil.  Continue wrapping additional lengthwise loops until you are content with the finished product.  At this point, you should have something that resembles the picture.  For the final loop, cross the thread back under itself (just like you would on a larger version of the coil).  With the coil still on the tweezers, apply some glue to the lengthwise coils and then set it aside to let it dry.

The second type of coil is our flat spiral.  If you are familiar with sailing lexicon, this is called a Flemish Flake.  Normally, these are started from the outside in, but in our case, we are going to start them from the inside out.  We are going to need wide packing or masking tape, tweezers, scale rope (thread will work again), and some white glue.  Tear off a piece of tape about 2-3 inches long.  With a length of rope/thread use the tweezers and press it down onto the tape.  Using the tweezers to keep the rope pinned against the tape, start wrapping the rope around the center point.  Once you have a full revolution around the center point, pull up the tweezers and press out the circle you have made so that it is flat against the tape.  Again, use the tweezers to hold the center and start wrapping the rope around the coil keeping the rope as close to parallel to the tape as possible.  What you are trying to do is pull the rope tight against the previous round of the coil using the tweezers to create a barrier between the rope and the table that the tape is laying on without letting the rope to double up on itself.  The first few rounds of the coil are the most delicate, the most you have, the easier the going.  After you have created a coil / flake of the desired size, take some white glue and sub it across the surface.  Once it dries, you will be able to pull the coil off of the tape and it will stay in the desired shape.

From here, it is up to your imagination about where to place your new creations.  In both of the above, it is advantageous to leave a length of rope/thread off of the end of your coil so that you can use that to blend your coil in with the rigging that you have run on your model.

unplugged ships

Monitor Windows EC2 Instance Free Drivespace via Cloudwatch

Amazon offers a lot of great CloudWatch metrics out of the box for EC2 instances, but there is a key metric that is missing.  Remaining available drive space.

Luckily, there is a relatively easy way to resolve this.  AWS offers us the ability to add in our own metrics that allow us to monitor pretty much anything we want.  In this case, we are going to create something to report back to CloudWatch about the free drivespace on our EC2 instance.

In preparation for this exercise, we are going to do a little prep work.

To start, ensure that the AWS SDK for .Net is available on your EC2 instance.  It should exist in C:\Program Files (x86)\AWS SDK for .NET\ by default.  If it doesn’t for whatever reason, download and install it.

Next, collect your Access Key and the Access Key Secret and put them to the side.  They’ll be used shortly.

The last thing you will need to gather is the instance ID for the EC2 instance that we’re going to collect metrics for.  If you are uncertain what this is, there are a few different ways to find it.  If you are running a more recent image, it is in the top right corner on the background image.  The best way to get the instance ID however is to log in to the AWS Management Console, go to the EC2 section and the instance ID will be shown in the grid.  It should start with a lowercase “i” followed by a dash and a hex string. e.g. i-a1b2c3d4

The next step is putting together a PowerShell script that will utilize all of the things that we have collected to this point to gather and report on the metrics that we’re after.

So, let’s get started.

Open your preferred PowerShell script editor and create a new ps1 file.  It doesn’t matter what it is called. I named mine **updatedrivespacemetrics.ps1 **for clarity.

At the top of the script, we are going to import the AWS assembly and set the access key values.

#Import the AWS SDK assembly  
Add-Type -Path "C:\Program Files (x86)\AWS SDK for .NET\bin\AWSSDK.dll" 

#Credentials        
$secretAccessKeyID="1234567890ABCDEF1234567890ABCDEF12345678"  
$secretKeyID="ABCDEF1234567890ABCD" #Get Instance ID $instanceId="i-a1b2c3d4"

Next, create a request object to store the new Metrics and give it a name that you will be able to easily recognize later on.

#Create request  
$request = New-Object -TypeName Amazon.CloudWatch.Model.PutMetricDataRequest   
$request.NameSpace = "CUSTOM-Freespace"

Time to collect the values.  We are going to use WMI to get the freespace from the drives on our instance.

#Get Free Space 
$freeSpace=Get-WmiObject -Class Win32_LogicalDisk | 
               Select-Object -Property DeviceID, @{Name='FreeSpaceGB';Expression={$_.FreeSpace/1GB}} | 
               Where-Object {$_.DeviceID -eq "C:" -or $_.DeviceID -eq "D:" }

Let’s look at what this statement is doing.

Get-WmiObject -Class Win32_LogicalDisk

This will return an array of all of the drives on the machine with their DeviceID, DriveType, Freespace, Size and VolumeName.

From this array, we are going to select the *DeviceID *and the FreeSpace.  However, *FreeSpace *is returning bytes and we need something that is a little easier to parse, so we are going to turn it into gigabytes.  To do this we are going to use an expression to modify the property value before we pull it back.

@{Name='FreeSpaceGB';Expression={$_.FreeSpace/1GB}}

Last, we are going to limit the drives that we pull back.  This part is optional, but can be useful if there are only specific drives that you are interested in.  In this case, I have narrowed it down to the C and D drives.

Where-Object {$_.DeviceID -eq "C:" -or $_.DeviceID -eq "D:" }

Time to start collecting this information into a way that AWS can parse it.  The first step to do this is creating some basic dimensions that will differentiate our custom metric.  To keep things simple we are going to create two dimensions, Role and InstanceID.

#Create dimensions 
$dimensions = New-Object System.Collections.ArrayList 
$dimension1 = New-Object -TypeName Amazon.CloudWatch.Model.Dimension 
$dimension2 = New-Object -TypeName Amazon.CloudWatch.Model.Dimension 

$dimension1.Name = "Role" 
$dimension1.Value = "Test Server" 
    
$dimension2.Name = "InstanceID" 
$dimension2.Value = $instanceId 

$dimensions.Add($dimension1) 
$dimensions.Add($dimension2)

With the dimensions in hand we are going to put everything together into a metric.  For each drive that we collected information on earlier, we are going to create a *MetricDatum *and populate it with the appropriate values.

#Create metrics 
$metrics = New-Object System.Collections.ArrayList 
Foreach ($item in $freeSpace) { 
     $metric = New-Object -TypeName Amazon.CloudWatch.Model.MetricDatum     
     $metric.MetricName = $item.DeviceID + "free space" 
     $metric.Value = $item.FreeSpaceGB $metric.Unit = "Gigabytes"   
     $metric=$metric.WithDimensions($dimensions) $metrics.Add($metric) 
}

After the metrics are created, we need to update the request object that we created earlier with the metrics data

$request = $request.WithMetricData($metrics)

Finally, we are going to submit all of this information back to AWS.

#Perform the request 
$client= Amazon.AWSClientFactory]::CreateAmazonCloudWatchClient($secretKeyID,$secretAccessKeyID) 
$response=$client.PutMetricData($request)

That’s it!  Now we have a script that will push information on available drivespace up to CloudWatch.  The first time it is run it will create the metric if it doesn’t exist.  Each subsequent time, it will just add a new data point to the existing metric.

The final step is scheduling this so that it runs consistently.  The easiest way to accomplish this is the built in Windows Task Scheduler.  I won’t go through the steps for that here, but I would suggest setting it up to run every 5 minutes.  If you are uncertain how to call your script, powershell c:\jobs\updatedrivespacemetrics.ps1 will get the job done (replace c:\jobs\ with the location of your script).

Now that you have everything set up, you can go into the AWS management console, go to the CloudWatch page and you should see your new metric.

Note:  You will need to set this up for each instance that you want to gather drivespace on.  Each instance will need its own copy of the script and have the task scheduler set up appropriately.  As you copy the script from instance to instance, you will need to change the InstanceID in the script to reflect the appropriate instance.

Small Design decisions with a large impact

I checked into a nice hotel yesterday. I was very impressed with the room and promptly set about unpacking my things. Because I had been traveling for nearly 20 hours straight, my devices were desperately in need of power.

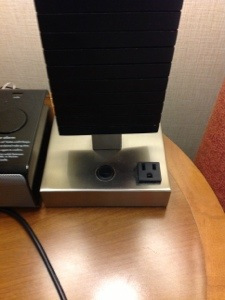
The lamp next to the bed conveniently had an outlet in the base of the lamp.

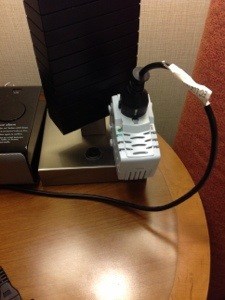
I do not have a US spec power supply for my laptop, so I am forged to use an adaptor. Now, granted, the adaptor that I have is rather comically large, (my primary one broke and I was forced to find this rather inadequate replacement) but it does serve to illustrate a point.

By simply rotating the outlet 90 degrees, this problem would not exist. Again, I realize this is a somewhat extreme use case, but in the instance where the plug was directly on the power brick, as is the case with many devices, this would still be an issue.

S3 directory browsing from a custom subdomain

This week I was asked to set up a site on our server with directory browsing enabled.  They also wanted to be able to upload files to said site.  Since we are already hosting our servers on AWS, I suggested to them that rather than expending the effort to write code to allow them to manage everything via the web, we set up an S3 bucket and allow them to manage the files directly from their desktop.

Somehow I had gotten to this point in time without working with S3.  I am aware of the principle behind it however and I knew it was capable of doing what I had proposed.

Creating a new bucket was easy. Configuring the permissions on the bucket to allow anonymous users was also easy.  Mapping the bucket to a sub-domain and enabling file browsing is where everything started to fall apart on me.

I logged on to AWS and created the bucket.  For the sake of example, let’s say it was called assets.mysite.com.  Something important to note here.  If you are planning on mapping the bucket to a sub-domain like I am in this example, it is typically best practice to make the name of the bucket the same as the sub-domain.

From there I set the permissions to enable everyone to be able to list the contents of the bucket.

Since I knew that my ultimate goal was to map this bucket to a sub-domain on the site, I immediately clicked down to the next tab “Static Website Hosting”, checked “Enable website hosting”, added an index document and clicked “Save”.  I copied the Endpoint that was provided on that tab assets.mysite.com.s3-website-us-east-1.amazonaws.com, jumped over to Route53 and added a CNAME for assets.mysite.com and dropped in the provided Endpoint.

Because I do my research, I knew that to get a list of files to show up, I would need to drop in some javascript to parse the XML content.  I grabbed some bucket listing code from the AWS community and uploaded it to the bucket.

Simple. Right?

Wrong.

The listing page loaded, but it didn’t show any of the content that I knew had been uploaded to the bucket.  I start going back through everything I had done, checking for the mistake.  I couldn’t find anything wrong.  I dug through the permissions thinking that perhaps something was off there.  Nothing.  So, I started going through the script and decomposing it to see if perhaps something was not working correctly with the script.  I found the following line where it pulls the list of available content:

http.open('get', location.protocol+'//'+location.hostname);

Aha!  So, I tried browsing to assets.mysite.com and all I got was a 404 error.  Thinking at this point that perhaps configuring things as a website is what caused the problem, I went back in and disabled the website hosting feature.  I tried again and got a 404 error again.  That was obviously not the issue.

Eventually, after poking around for a while, I stumbled across a different endpoint assets.mysite.com.s3.amazonaws.com.  This returned the XML that I was expecting!  Armed with this new information, I went back and modified the line from the script that was reaching out for the XML to:

http.open('get', 'http://assets.mysite.com.s3.amazonaws.com');

Surely this was going to solve my problem … or not.

This time I am getting a 405 error.  I immediately start googling and digging through the documentation and discover that the issue I am running into is because I am trying to do cross site scripting.  assets.mysite.com needs permission to talk to assets.mysite.com.s3.amazonaws.com. Armed with a little more information now, I run back into the S3 management console and start looking at the options available to me in the permissions tab.  I click on the “Edit CORS Configuration” button and edited the rules to include:

<CORSRule>
    <AllowedOrigin>*</AllowedOrigin> 
    <AllowedMethod>GET</AllowedMethod> 
</CORSRule>

Now when I go to the listing page, I see all of my files!  Mission successful.

Hopefully this can help some of you out.  Myself and a coworker tore (what’s left of) our hair out for a while going through all of the motions on this.